Sending money home can be quite stressful when living in Japan. Whilst I can’t offer any advice about when to transfer home – although, to be honest, with the rates as they are at the moment I’d probably be keeping my money in yen if I were you – I can offer advice about how to exchange your yen for another currency when the time comes.
The Old-Fashioned Way
Depending how long you’ve been in Japan, it might be worth considering simply taking your yen home in cash with you on your flight home. When you arrive in your home country you can then take it to a trusted exchange, and you’ll have successfully transferred your money.
It’s worth noting that the limit for carrying your own cash is 1 million yen. Of course, this method is at your own risk and you have to be comfortable carrying that kind of money on you.
Wise
For those that prefer the electronic method, one of the most popular ways to transfer money home is using the company Wise. Wise is a global company that makes it easy to move money across different currencies.
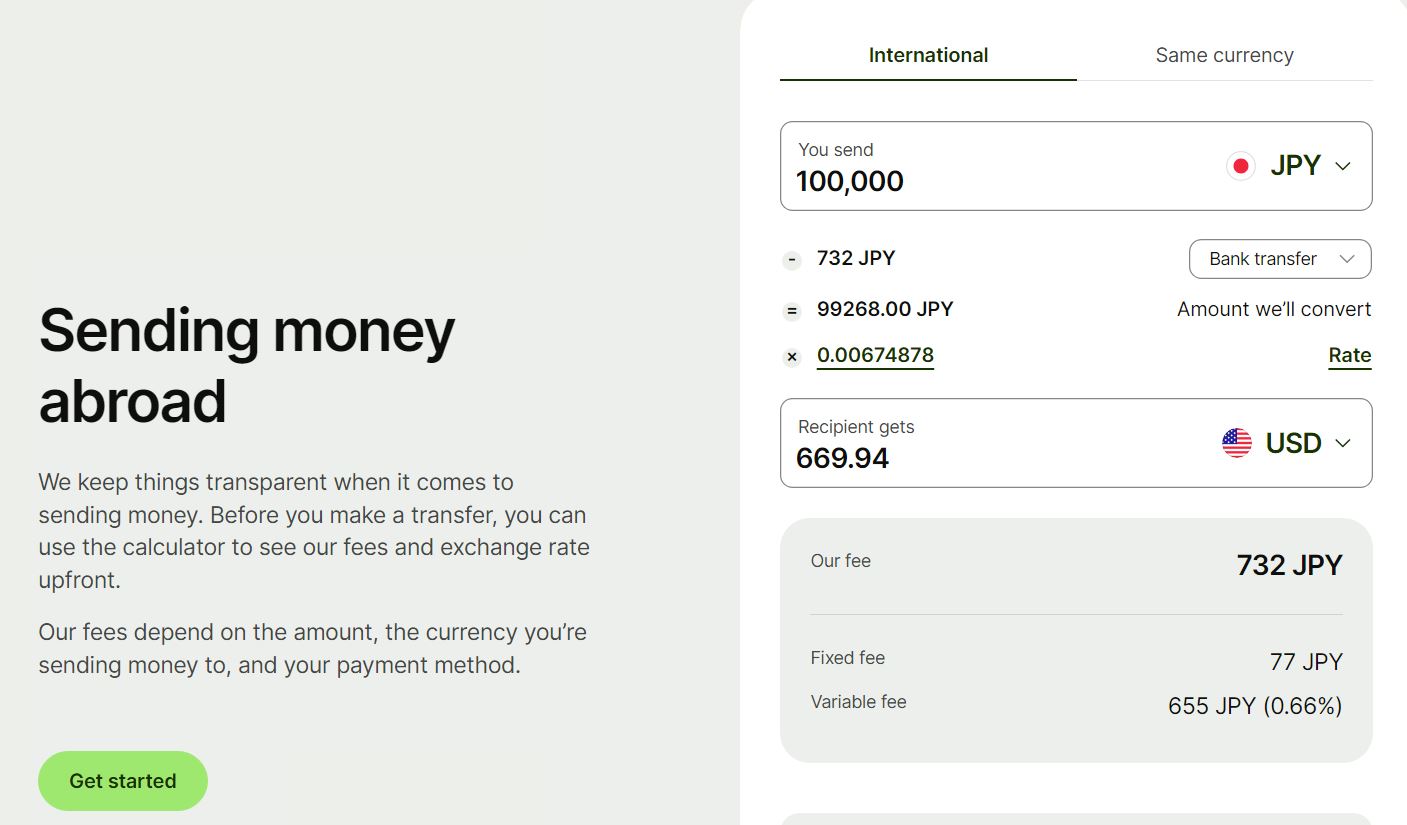
The rates that Wise offer are normally some of the most competitive on the market. The rates change depending on the amount being sent and currency being converted to, but as a ballpark figure, I looked at how much it would be to get 100,000 yen transferred to USD. As you can see below, the fees only amounted to 732 yen which I would argue isn’t too shabby.

Getting Verified:
Before you can start using a Wise account to send money home, you’ll need to get verified. The procedure changes for every country but for Japan, I’ll outline the process below:
Step 1: You’ll need to submit an ID before getting verified. You’ll need to submit one that contains your current Japanese address. Acceptable options include My Number cards, Japanese driver’s licenses, Japanese passports issued before February 2020, and residence cards.
Step 2: You’ll be sent a unique 4-digit code which you should jot down. This code is exclusive to your application and expires after 30 minutes.
Step 3: Take 3 pictures of your chosen ID. Firstly, photograph the front of your ID with the code you wrote down placed directly below it. Tilt the ID to display its thickness while ensuring the details remain visible. For the second image, focus on the back of your ID (excluding passports). Keep the code for future use.
Step 4: Take a photograph of yourself holding the code you wrote down earlier next to your face.
Step 5: If you opted for a My Number card in Step 1, you can skip this step. Otherwise, present documents containing your My Number and current address. Accepted documents include the Notification card (通知カードtsuchi ka-do), My Number card, or a residence record (住民票juminhyo). Ensure that the residence record is issued within the last 6 months and obscures details of other family members. You can get a 住民票juminhyo from your local city hall.
Getting Your My Number card:
You’ll need a My Number card to get verified to send your lovely yen via Wise. A My Number card is like a social security number. The government has been pushing people to get their card recently. Unfortunately, the campaign which gave people free money for signing up to get a My Number card ended recently, but keep your eyes peeled in case another one starts.
2 or 3 weeks after you first submit a residence certificate in Japan, you’ll be sent an envelope containing a ‘Notification Card for My Number (通知カードtsuchi ka-do)’ and the ‘Application Form for the Individual Number Card.’ The procedure is super simple to apply using these cards and it can be done via a paper method or online. It’ll take about a month from sending the application in to receiving your card. It should be free to get the card too, which is always nice!
The My Number card does run out though and it’s something to keep an eye on. If you need to renew the card, you should complete the online application or go to your municipal office. It doesn’t cost money to renew your card if you do it within the expiration date.
I, unfortunately, didn’t realise it expired at first and when I went to renew it realised that I couldn’t. I had to go and get a new 住民票juminhyo and submit it at the city hall where I live. It wasn’t hard, but it was a bit of a ball-ache. I was charged a thousand yen for renewal too.
It took about one month to receive notice that my My Number card was ready to be picked up from the city hall.
How to actually send the money via Wise:
When it comes time to actually send the money via Wise what you’ll do is log in to your online Wise account. From there you’ll start a transaction and choose what bank account you’ll want to send to.
You’ll need some details including: Recipient name & address, Bank account number, and IBAN. You’ll possibly need a BIC/SWIFT code. Once you go through the procedure you have 2 working days to transfer the money to Wise’s Japanese account. This bit feels kind of sketch as you’ll be sending likely large amounts of money to a random account, but it’s fine.
You can send money at an ATM via 振込 bank transfer. Once they receive the money into their Japanese account, they’ll send your money to the desired recipient account. I always find this transfer to be prompt and incredibly smooth. If you aren’t too well-versed in 振込 bank transfer then it might be worth taking a Japanese friend with you.
This bank transfer will be an internal transfer within Japan, so the fees aren’t excessive, but I would be prepared to pay around 500 yen in fees for most banks if you’re transferring over around 30,000 yen.
Japanese Banks
I know banks in Japan can send money internationally, but I haven’t met a foreigner who hasn’t been burned by doing this. JP Post Bank, for example, charges a fixed 7500 yen for any international transaction, regardless of the amount. There’s a reason why Wise has become probably one of the most popular apps for this purpose.
Probably the best way to send money from Japan to another country is to use Wise. Get yourself a My Number card when you first move to Japan, and it should be a breeze to set up.


